
The Route panel
This is the main panel (located on the left-hand side of the page) where you will create/edit/plan your route. The panel is collapsible, but is opened by default since it is used most often.
Route Selector
At the top of the panel are the Route Selector buttons:
...described as follows:

|
Create a new route (wiping out all current Waypoints on map) |
 |
Select a route from the FlyLogical database (wiping out all current Waypoints on map) |
 |
Save current route to the FlyLogical database. Options are presented in the pop-up window for "Save..." (update existing database entry) or "Save As..." (create new database entry) |
 |
Import/export route to/from a ".gpx" file (when importing, wipes-out all current Waypoints on map) |
 |
Open the route in the iNavCalc RouteView window enabling you to share your route with anyone via web-browser, email, or Twitter. |
Waypoint Search
Immediately below the Route Selector is the Waypoint Search panel:

Enter the name to be searched (e.g., ICAO code for an airfield, letter-code for a navaid, name of a user-defined Waypoint, or a more general free-text description such as the street address of a desired location), and hit the Search button. A search will first be performed against the FlyLogical database. If a relevant entry is found in the FlyLogical database, a pop-up will be presented with the details. You can choose to accept this result, and have the Map Cursor (see below) located accordingly. Otherwise, if no result found in the FlyLogical database, a more general search will be performed via Google. If successful, the Map Cursor (see below) will be centered on the resulting location.
Map Cursor panel
Immediately below the Waypoint Search panel is the Map Cursor panel:
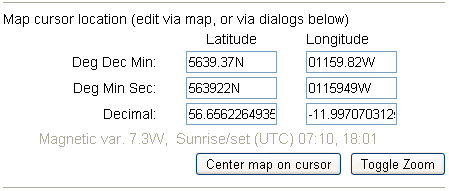
This panel displays detailed information (location coordinates in three common formats, the magnetic variation, and the sunrise/sunset times) corresponding to the current location of the Map Cursor (represented by cross-hairs on the map). The Map Cursor can be moved or re-located by any of the following methods:

|
|
The other buttons contained within the Map Cursor panel have the following functions:

|
Center the map on the current Map Cursor location |

|
Toggle the map-zoom state in order to quickly zoom-in e.g., to inspect an airfield layout (or satellite image) in detail, then zoom back out again to original magnification level, avoiding the need to manipulate the incremental zoom controls. |
Waypoint Insert panel
Immediately below the Map Cursor panel is the Waypoint Insert panel:


...whose button functions are described as follows:
 |
Add current Map Cursor location as a new Waypoint in the route displayed on the map. ***TIP: the same thing can be achieved by double-clicking on the map*** The new Waypoint will be inserted immediately after the currently-selected Waypoint (see below on how to select a Waypoint), or will simply be added to the end of the route, if no Waypoint is currently selected. ***TIP: an alternate method for inserting a new Waypoint is to click on a given leg (i.e., the line between two successive Waypoints) on the map. This will open a pop-up (with summary information pertaining to that leg) which includes the option to insert a new Waypoint. The newly-inserted Waypoint will be initially located in the middle of that leg, but can then be moved or dragged anywhere*** |
 |
Move the currently selected Waypoint (see below on how to select a Waypoint) to the current Map Cursor location. This enables you to re-position a given Waypoint to a precisely-determined location. Note: only non-stationary Waypoints (depicted with green icons
 ) can be moved. Examples of non-stationary Waypoints are those created by arbitrarily clicking in free areas on the map. By contrast, stationary Waypoints (depicted with yellow icons ) can be moved. Examples of non-stationary Waypoints are those created by arbitrarily clicking in free areas on the map. By contrast, stationary Waypoints (depicted with yellow icons ) cannot be moved. Examples of stationary Waypoints are those created from entries in the Flylogical database such as airfields, navaids, user-defined Waypoints etc., whose geographical locations are fixed and should not be arbitrarily moveable. To change the location of a stationary Waypoint which you "own", you must access it via the iNavCalc WayPoint Editor pages and associated utilities. If you do so, the new location will not be automatically reflected in your route. Instead, if you require the new location to be used, you will need to delete the stationary Waypoint from your route, and re-insert it. You cannot change the location of stationary Waypoint which you do not "own". ) cannot be moved. Examples of stationary Waypoints are those created from entries in the Flylogical database such as airfields, navaids, user-defined Waypoints etc., whose geographical locations are fixed and should not be arbitrarily moveable. To change the location of a stationary Waypoint which you "own", you must access it via the iNavCalc WayPoint Editor pages and associated utilities. If you do so, the new location will not be automatically reflected in your route. Instead, if you require the new location to be used, you will need to delete the stationary Waypoint from your route, and re-insert it. You cannot change the location of stationary Waypoint which you do not "own".Note: irrespective of whether it is stationary or non-stationary, the currently-selected Waypoint will be temporarily depicted by a white icon  indicating that it is currently selected. indicating that it is currently selected.***TIP: an alternate method for re-locating a selected (non-stationary) Waypoint is to simply drag it anywhere on the map (i.e., "rubber-banding") *** |
Waypoints-In-Route panel
Immediately below the Waypoint Insert panel is the Waypoints-In-Route panel:

The buttons in the panel have the following functions:

| ...which lists all the Waypoints in the route currently displayed on the map. You can select any Waypoint in the list (scrolling-down if necessary). The currently-selected Waypoint is highlighted (shaded) in the list, and corresponds to the white icon on the map. Likewise, you can select a Waypoint by clicking on its icon on the map, and it will be automatically selected in the list. ***TIP: if the map happens to be panned-away from the selected Waypoint, by double-clicking on the selection in the list, the map will be automatically panned back on to the selected Waypoint*** |
The buttons in the panel have the following functions:

| Change the name of the selected Waypoint via the text-box on the left. Note: only non-stationary Waypoints can have their names changed here. To change the name of a stationary Waypoint which you "own", you must access it via the iNavCalc WayPoint Editor pages and associated utilities. If you do so, the new name will not be automatically reflected in your route. Instead, if you require the new name to be used, you will need to delete the stationary Waypoint from your route, and re-insert it. You cannot change the name of stationary Waypoint which you do not "own". |

| Save the selected Waypoint to the FlyLogical database. This enables you to compile a library of your own Waypoints for convenient re-use. You can also share them with everyone ("public") or with specified iNavCalc users. You can view your collection directly on the map via the Info panel. This enables you to add a given Waypoint from your collection to the current route by clicking on its map icon. Alternatively, once saved in the FlyLogical database, your collection of Waypoints is searchable via the Waypoint Search panel (described earlier). |

| Moved the selected Waypoint "up" (i.e., towards the start) in the ordering of Waypoints along the route. |

| Moved the selected Waypoint "down" (i.e., towards the end) in the ordering of Waypoints along the route. |

| Remove the selected Waypoint from the route. Note: this action only removes it from the map display of the route-under-edit. It does not fundamentally delete any stationary Waypoint from the FlyLogical Waypoints database, nor does it delete the given Waypoint from the route profile saved in the database (unless you you subsequently choose to "Save" the modified route accordingly). ***TIP: the same action can be be achieved by double-clicking on the given Waypoint icon on the map*** |

| Reverses the order of the Waypoints along the route. Note: this action only reverses the order in the map display of the route-under-edit. The route profile saved in the database is unchanged (unless you subsequently choose to "Save" the modified route accordingly). |

| Remove all Waypoints from the route. Note: this action only removes them from the map display of the route-under-edit. It does not fundamentally delete any stationary Waypoints from the FlyLogical Waypoints database, nor does it delete them from the route profile saved in the database (unless you you subsequently choose to "Save" the modified route accordingly). |
Nav Planning panel
Immediately below the Waypoints-In-Route panel is the Nav Planning panel:


...within which the "Click for PLOG, MET, NOTAMs, Frequencies along the route" button opens a pop-up window where you can submit a request for a comprehensive suite of Nav Planning documents for the route. The package is delivered to you by email (a few moments after submission), and includes the following:
- The route exported as a ".gpx" file for portability with any compatible software or device
- The route exported as an ".fpl" file for portability with Garmin avionics devices (testing by FlyLogical so far has been limited to the Garmin AERA 795, but reports by other users suggest success with other Garmin devices).
- A PDF file containing a detailed PLOG for the route. There are many optional parameters for controlling the PLOG calculation which can be set via the "command-line" within the pop-up interface. The full set of options is documented here. By default, all winds aloft, temperatures, and pressures used in the PLOG calculations are determined automatically from global forecasts (but this behavior can be switched-off via a parameter if you want to manually set them (as per my "When the wind blows, you always lose on the roundtrip" article which makes extensive use of the iNavCalc PLOG functionality with manual MET settings)
- A PDF file containing METARs and TAFs along the route (the MET stations spaced along the route are selected automatically, in the order that you reach them).
- A PDF file containing NOTAMs along the route (the NOTAM stations spaced along the route are selected automatically, in the order that you reach them).
- A PDF file containing NAV and COMM frequencies along the route (the navaids and COM stations spaced along the route are selected automatically, in the order that you reach them).
If you just need a rough idea of distance, time & fuel when devising the route, you do not need to generate the full planning package via email (ordinarily, you would only do this later in the planning process). Instead, you can simply enter your desired values for speed and fuel (volume and burn rate) in the Speed, Fuel, and Flow edit-boxes in the Nav Planning Panel. These will be automatically reflected in the Route Summary status bar located above the map, screenshot below:
For convenience, the text color follows a "traffic light" pattern: green (as in above example) if fuel sufficient for the route ; amber, if fuel required breaches 80% of available; red, if insufficient fuel for the route. Note: the units used in Speed, Fuel, and Flow edit-boxes are derived from your culture parameter which can be set as described in the full documentation here . This culture parameter is "sticky" meaning that it get's remembered for a given user, until that user changes it again. Moreover, the settings transcend (i.e., are "synced" across) all the iNavCalc interfaces: the web-app, the mobile-app, and the email-based planner. So you set them once and they work everywhere within the iNavCalc family of apps.
The Info panel
This is a collapsible panel (located on the left-hand side of the page) where you can optionally add or remove map features. The panel is closed by default, but can be opened (and "pinned") by clicking on its tab.

Adding/Removing map features
To add/remove map features, do the following:- Select a country for which you would like to add/remove the map features
- Select the "ownership" category: "Public" (those features which are shared with everyone), "Mine" (your own features) , or "Shared" (either your own features, or those shared explicitly with you by another user who owns them, but which are not available to everyone)
- Click the "Show" button for the desired category of feature. For example, selecting "United Kingdom, Public, Airfields" will add the features to the map, as shown in the screen shot below (clicking the corresponding "Remove" button will remove them again).

- Clicking on a given map feature icon will focus the Map Cursor in it. You can then click the "Add as new..." button (in the Route Panel) to add this map feature as a Waypoint.
- ...alternatively, you can double-click on the map feature icon to quickly add it to the route
The Radials panel
This is a collapsible panel (located on the left-hand side of the page) where you can work with Radials and Bearings etc. The panel is closed by default, but can be opened (and "pinned") by clicking on its tab.

The functionality within the Radials Panel is summarised as follows:

The functionality within the Radials Panel is summarised as follows:
- Click the "Set Centre" button to set the desired centre-point to coincide with the current Map Cursor location. For example, in the screenshot above, the Map Cursor has been positioned on the IOM VOR, and the "Set Centre" button clicked. The resulting centre point is depicted by the orange-circle-with-small-cross-hairs in the screenshot below (located on the position of the IOM VOR).
- Now position the Map Cursor in some other location, and click the "Add Radial button". A Radial Line will be drawn between the centre and the current Map Cursor location, as shown on the screenshot below. The True and Magnetic To and From bearings/steers and Range are populated in the Radial Panel edit-boxes, as shown in the screenshot above.
- The position of the end-point can be moved by clicking-and-dragging it, or, for precise positioning, by manually-editing the numerical values in the edit-boxes. This latter method enables you, for example, to determine a location based on the range/bearing from a given reference. You can then add this as a Waypoint to the route (as explained earlier).
- You can have as many Radial Lines as you wish on the map at a given time
- Likewise, you can reset the centre-point as often as you wish, and add as many Radial Lines as you wish from any of the centre-point locations.
- All Radial Lines are saved with the route if you save the route to the FlyLogical database. This enables you to review them when you next open the route for edit.
- The "Clear Radial" button removes a given Radial Line from the map (and the "Clear All Radials") button removes all Radial Lines from the map.
- In a similar manner to the functionality described here, the iNavCalc command-line interface (available in the mobile- and email- version of the app) allows you to specify waypoints in terms of bearings (from the previous Waypoint or from a reference Waypoint) without having to use the map. See my article "Flight route-planning the old-fashioned way -- almost" for a detailed walk-through example of this.
